Back to TheWorxHub for Senior Living Main Menu
Adding Contractors and Suppliers
How to Add a Contractor or Supplier
- Click on the Add button in the top right corner of the page and select Staff/Contractor/Supplier.
General Info
- Select either Contractor or Supplier under Who are you adding? *Note: If this person is both a Contractor and a Supplier, select Contractor.
- Enter the Company Name.
- Select the Department and Role from the pick lists.
- If you are entering a contractor, we suggest entering the contractor's trades into the Trades/Supplies field. This helps the person assigning labor to make sure the most qualified person is assigned to the work.
- Enter the COI Expiry and Expiration date if needed. A reminder of the expiration will appear on the main dashboard within 90 days of the dates entered.
- Enter any additional information for the contractor/supplier.
- Click Save. *Note: After saving the information in the General Info section, additional options will appear on the page.
- If needed, click the Upload Photo link to select a photo of the contractor/supplier from your computer.
- To add a contact to the contractor/supplier click the New Contact button.
- In the Add New Contact window, enter the contact's First Name, Last Name, and any additional details.
- Select the Department from the pick list.
- If this contact needs to be the primary contact, check the Make Primary Contact box.
- If the contact is responsible for supplies and ordering for the company, check the Purchasing Contact box.
- Click Save to add this contact to the contractor/supplier.

Contractor/Supplier Info
In this section, you can enter information about any service contract you have with the contractor/supplier.
- Click on Contractor/Supplier Info to expand this panel.
- Check the box if you have a Service Contract with the contractor/supplier.
- Enter any details about the contract and click Save.
You can also enter supplier information in this section.
- Enter the Account #.
- If you have a Supplier Discount, enter the discount as a percentage.
- Include any shipping costs and payment information in the remaining fields and click Save.
Rates
In this section, you can select a pay rate for the contractor/supplier.
- Click on Rates to expand this panel.
- Select the Rate Name by clicking the field and choosing an option from the pick list.
- Enter the Rate.
- Select the Effective date in the mini calendar.
- Check the Default box if this is the contractor/supplier's default rate.
- Click the Save icon (
 ).
).
Certifications
In this section, you can add any certifications for the contractor/supplier.
- Click on Certifications to expand this panel.
- Select the Certification by clicking the field and choosing an option from the pick list.
- Select the Expiry Date and Certification Date by clicking in the field and choosing the date on the mini calendar.
- Enter any Requirements if necessary.
- Click the Save icon ().
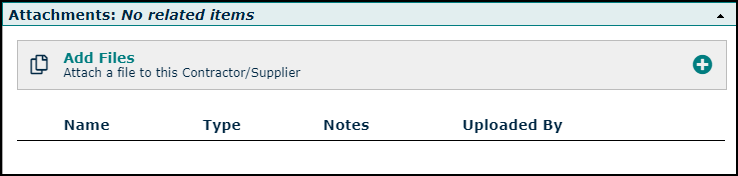
Attachments
In this section, you can add any attachments from your computer, the web, or from a Dropbox account.
- Click on Attachments to expand this panel.
- Click the Add Files link.
- The File Selection window will display a list of files recently uploaded to the File Library.
-
Use the Search field to search for additional files.
-
Check the box for any file you would like to attach to the contractor or supplier, then click the Add Files button.
-
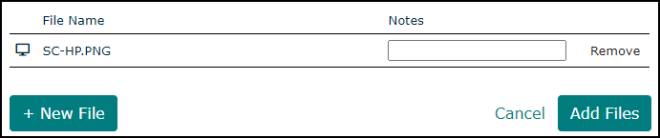
If the file does not currently exist in the library, click the +New File button to attach the file to the contractor or supplier.
-
In the window that appears, choose the source of the attachment. *Note: If a new image or document is attached to the project, it will also be uploaded to the File Library.
-
Select Choose File to upload a file from your computer.
-
Select Dropbox to link to a file in a Dropbox account.
-
Select URL to enter a link to a document or file on a web page.
-
-
If you have selected the wrong file, click the Remove link and repeat this process to select the correct file.
-
Enter a note or description of the file in the optional Notes field, then click the Add Files button.
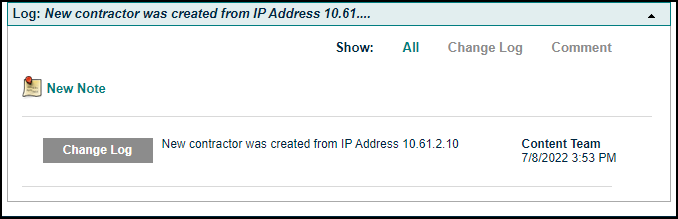
Log
The Log is where any changes made to the contractor/supplier will be recorded.
- Click Log to expand this panel.
- You can record a note in the Log by clicking the New Note button.
- Enter the note in the text box and click Save.